The manner in which Glk manages the screen may seem extremely alien to some. Though GWindows abstracts much of this from the user, the underlying model has visible influences on how the GWindows User Interface hierarchy is structured.
The basic subdivision of the screen in Glk is a window. The way you make a new window is to take an existing window and split it in half. This split can be vertical, or horizontal.
Because windows are always created by splitting other windows (the first window created is a special case; it is always created such that it occupies the entire screen. Generally, you will want to arrange your user interface so that the first window created is the window with the most "leeway" in its size; as other windows are split off, this first window will get smaller and smaller. You do not explicitly declare its final size; it will simply end up occupying whatever part of the screen hasn't been given over to other windows. In all of the example programs, the main output window is the first window created, so that its size is generally considered "everything but the space I'm specifically giving to other windows."), a very important concept in Glk is that "window pair". A window pair is a kind of window which is never created explicitly. Whenever you split a window Y from a window X, you can think of what happens as "replace X with a window pair of the same size. Inside this window pair is a new window Y, which has the given size. X is placed inside the pair, and takes up whatever space is left over after creating Y."
When designing a user interface, it's best to have a concrete idea of how it should look to begin with. At the very least, you'll want a rough sketch on paper. If your interface is very complex, you might want to draw a full mock-up in some kind of graphics editor. This will give you a very concrete idea of what you're aiming for. If your UI is going to involve graphics, this will also give you a head-start on drawing them.
You don't know how big the player's screen will be. You can try to force the player to use a screen to your liking, but many players will be upset by this. It's better to make the layout as flexible as possible. GWindows defaults to a "proportional" measurement system (though you can change this for specific windows), so that the windows will size themselves to look more or less the same, no matter what size screen is used. The author prefers to design UIs on a 640x480 image, which is smaller than most modern screens, because many players prefer not to use their entire screen area for the game, and because 640x480 is both a standard size, and a convenient proportion of larger screens. A well designed UI could be designed on a 640x480 screen, but still look right on screens of any size (within reason).
Let's consider a very complex example.
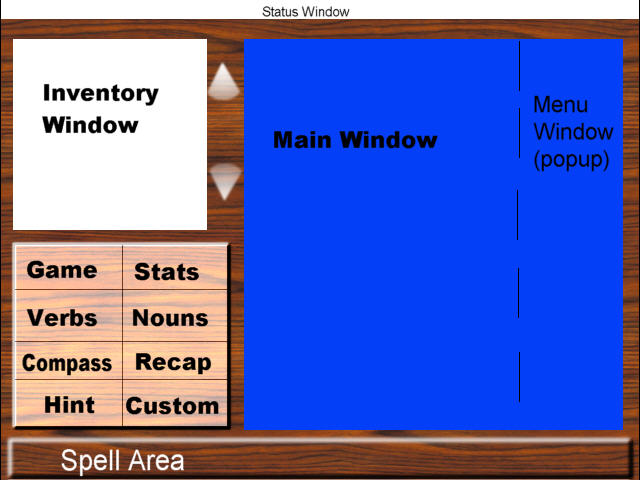
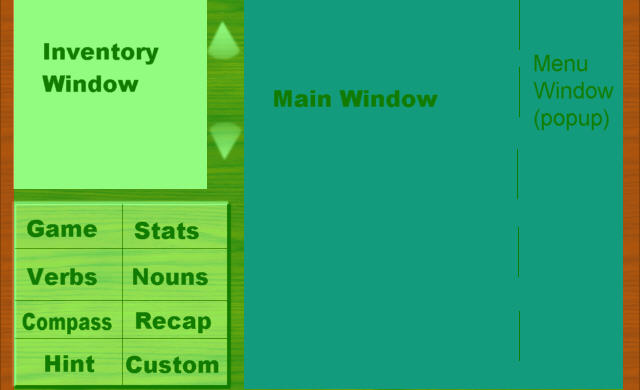
This is a mock-up for a game with a highly graphical user interface for a fantasy game, specifically, the GWindows port of Graham Nelson's Balances, the source to which is included with GWindows. It has five major areas: the status line, the inventory window, the control buttons, the main window area, and the spell bar. Now, there will also be other windows created, for example, for the trim around the image. Let's see how it breaks down...
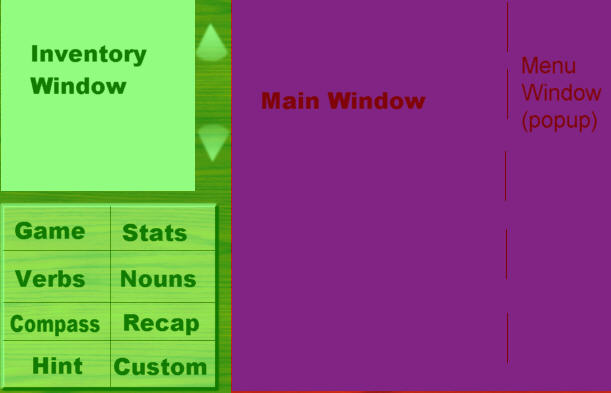
Every time you create a split, you're splitting along lines which run the entire length of the area you're splitting. In this example, there are two such lines -- below the status line, and above the spell bar. Because you want the status line to have an absolute height of 1 line, it's easiest to split here. This image shows the same UI, with red and green overlays showing where the first split will happen.
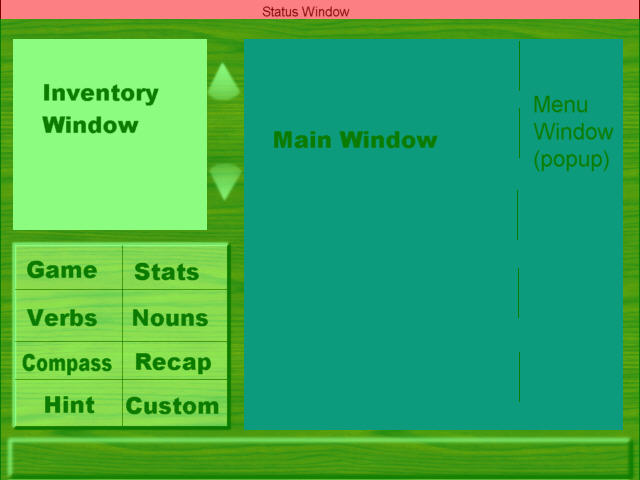
Now, we have our "top level" window pair. Right now, the window tree looks like this:
                 root
                /       \
        Status          Everything else
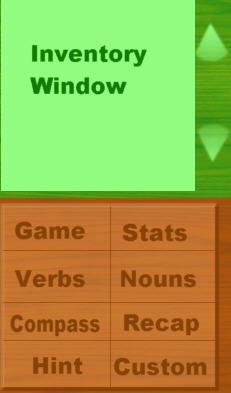
We'll call Everything Else the "game area". Since the Status Window is the only thing in its part of the split, we're done with it for now. Let's look at the game area.
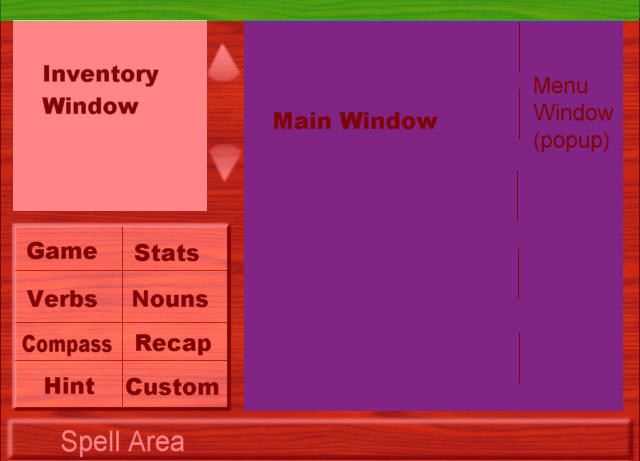
The game area looks to have only one split which spans its entire length, so now we have to split off the spell area.... But wait. There's trim at the top that forms a line all the way across as well. Let's get rid of that.
                 root
                /       \
        Status          game area with trim
                        /               \
                top trim                "real" game area
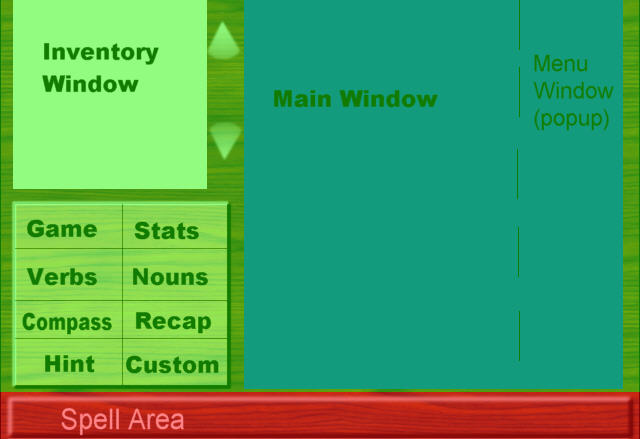
Now we move on to that spell bar. We'll call what's left the "client area"
                 root
                /       \
        Status          game area with trim
                        /               \
                top trim                "real" game area
                                        /               \
                                Spell area              Client Area
Again, the obvious thing to do is to separate the main window area from the buttons, but let's get rid of that trim first. (if you don't mind, we'll do both splits in the same step)
                 root
                /       \
        Status          game area with trim
                        /               \
                top trim                 "real" game area
                                        /               \
                                Spell area              Client Area with trim
                                                        /                  \
                                Client area without left trim              left trim
                                /                       \
                        "real" Client area              right trim
(At this stage, the order isn't important; the graph just changes directions to keep it all on one page)
Now, we do the obvious split, separating the main window area from the area where the controls are.
                 root
                /       \
        Status          game area with trim
                        /               \
                top trim                 "real" game area
                                        /               \
                                Spell area              Client Area with trim
                                                        /                  \
                                Client area without left trim              left trim
                                /                       \
                        "real" Client area              right trim
                        /               \
                Controls                Main window area
Unlike before, both of these areas are going to be subdivided. Let's look at the left side first.
The control area divides easily into a top and bottom. We could
divide the bottom into nine smaller windows (the eight buttons, and
the trim), but for the sake of this explanation, let's just say that
this is good enough (and it is; in GWindows, this would be a good
place to use a GImageMap to define clickable areas within
a single window)
                 root
                /       \
        Status          game area with trim
                        /               \
                top trim                "real" game area
                                        /               \
                                Spell area              Client Area with trim
                                                        /                  \
                                Client area without left trim              left trim
                                /                       \
                        "real" Client area              right trim
                        /                 \
                Controls                  Main window area
                /       \
        buttons         Inventory area

Now, let's look at the inventory area. We could do the same trick here, but since the arrow buttons have such a distinctly different purpose, it'll be easier in the long run to separate the two.
                 root
                /       \
        Status          game area with trim
                        /               \
                top trim                "real" game area
                                        /               \
                                Spell area              Client Area with trim
                                                        /                   \
                                Client area without left trim              left trim
                                /                       \
                        "real" Client area              right trim
                        /                  \
                Controls                   Main window area
                /       \
        buttons         Inventory area
                       /       \
                inventory       arrows
Okay. We're done with the controls. Let's go back to the main window area. The main window area consists of the main window, and the popup menu. Once we split them, we finally have the whole window tree:
                 root
                /       \
        Status          game area with trim
                        /               \
                top trim                 "real" game area
                                        /               \
                                Spell area              Client Area with trim
                                                        /                  \
                                Client area without left trim              left trim
                                /                       \
                        "real" Client area              right trim
                        /                  \
                Controls                    Main window area
                /       \                   /               \
        buttons         Inventory area     main window     popup menu
                        /       \
                inventory       arrows
There! We're done, right? Not by a long shot. We have to size the windows. Now, working out which windows get which size is tricky. The first thing we want to do is work out what order we'll open the windows in. Though there are lots of possible orders, some are a lot harder than others. Remembering what we said above, we'll decide to open the main window first. Now, once you've opened a window, the easiest next step is to complete its pair.
                 root
                /       \
        Status          game area with trim
                        /               \
                top trim                 "real" game area
                                        /               \
                                Spell area              Client Area with trim
                                                        /                   \
                                Client area without left trim               left trim
                                /                       \
                        "real" Client area              right trim
                        /                 \
                Controls                 (3) Main window area
                /       \                 /               \
        buttons         Inventory area   1 main window   2 popup menu
                        /       \
                inventory       arrows
The number beside the main window area is parenthesized because it's a pair window -- remember, you don't create them yourself, but glk will magically create it as a result of creating 1 and 2. Now, we apply what I just said about completing the pair, which means we have to generate the 'controls' window. Again, we can't create it directly, so we have to create its children. We could do this in either order, but here's a rule of thumb: take care of window pairs before you take care of windows. Yeah. These rules sometimes contradict each other. We repeat this process until we've built the whole tree...
                 (19) root
                /       \
        18 Status       (17) game area with trim
                        /               \
                16 top trim             (15) "real" game area
                                        /               \
                                14 Spell area           (13) Client Area with trim
                                                        /                   \
                                (11) Client area without left trim          12 left trim
                                /                       \
                        (9) "real" Client area          10 right trim
                        /                    \
                (8) Controls              (3) Main window area
                /       \                    /               \
        7 buttons       (6) Inventory area  1 main window   2 popup menu
                        /       \
                4 inventory     5 arrows
How does this help us with the sizes? Well, let's set down some rules.
Now, Let's go through and annotate the window tree. Under each window,
we will write down where it gets its size. This will either be
itself, the name of another window, or implicit, to
indicate that the window's final size will be whatever is left over
after sizing its sibling.
                 (19) root
                 main window
                /       \
        18 Status       (17) game area with trim
        itself          implicit
                        /               \
                16 top trim             (15) "real" game area
                itself                  implicit
                                        /               \
                                14 Spell area           (13) Client Area with trim
                                itself                  implicit
                                                        /               \
                                (11) Client area without left trim      12 left trim
                                implicit                                itself
                                /                       \
                        (9) "real" Client area          10 right trim
                        implicit                        itself
                        /                     \
                (8) Controls                  (3) Main window area
                inventory                     implicit
                /       \                     /               \
        7 buttons       (6) Inventory area   1 main window   2 popup menu
        itself          implicit                implicit        itself
                        /       \
                4 inventory     5 arrows
                implicit        itself
As a check, we can assert three things about this tree:
The third rule is the trickiest. If you find that it isn't true, you have to rearrange the window tree such that it is. Our "rule of thumb" about handling window pairs before windows is designed to help with this; since only "real" windows size other windows further up the tree, any window that needs to size itself has to be a younger window.
Now we insert the actual sizes. This is where it's really helpful that we designed the interface on a graphical tool; we've got a lot of measuring to do. Except for the status line, which will have an absolute size of 1 line, all the windows will have proportional sizes. After some measuring, we come up with the following metrics...
Note that we only need one measurement for each window -- we need the measurement that corresponds to how it'll be split. In fact, we have a lot more measurements here than we actually need, but since this is a demonstration, we won't bother with trying to cut corners.
We'll do a little juggling of the numbers to convert these into proportions. We only need to work out the sizes of windows that aren't implicitly sized. We'll also note the direction of the split. The direction of the split tells us where the window goes in relation to its sibling.
Notice that the root window doesn't appear anywhere on these lists. It automatically gets the entire screen.
To finish our tree, we insert these sizes. If a window sizes itself, we put its size with it. If a window's size comes from some other window, we put the size there.
                 (19) root
                 main window
                /       \
        18 Status       (17) game area with trim
        itself          implicit
        1 line
        above
                        /               \
                16 top trim             (15) "real" game area
                itself                  implicit
                4%
                above
                                        /               \
                                14 Spell area           (13) Client Area with trim
                                itself                  implicit
                                11%
                                below
                                                        /                       \
                                (11) Client area without left trim      12 left trim
                                implicit                                itself
                                                                        2%
                                                                        left
                                /                       \
                        (9) "real" Client area          10 right trim
                        implicit                        itself
                                                        3%
                                                        right
                        /                       \
                (8) Controls                    (3) Main window area
                inventory                       implicit
                /       \                          /               \
        7 buttons       (6) Inventory area      1 main window   2 popup menu
        itself          implicit                implicit        itself
        47%                                     (root           27%
        below                                   automatically   right
                                                gets the whole
                                                screen)
                        /       \
                4 inventory     5 arrows
                implicit        itself
                (controls)      15%
                38%             right
                left
You can see from this tree that most of the window layout is straightforward. Only two windows have an unintuitive size; the main window and the inventory window. When you create these windows, the size you specify is actually the size of a pair window higher up the tree.
The good news is that you now know everything you need to generate the windows for a new interface.